Sodium Dodecyl Sulfate Poly-Acrylamide Gel Electrophoresis (SDS-PAGE)

Principal

SEPARATION OF PROTEINS UNDER DENATURATING CONDITIONS IN AN ELECTRIC FIELD.

The process can be divided into 4 steps:
1) Sample preparation
2) PA-gel preparation
3) Electrophoresis
4) Downstream process
   - direct staining of the gel
   - transfer of the protein to a membrane (blotting)

A nice animation was made by Lodish et al. ©:
SDS, Lodish

1) Sample preparation

Samples from cells (or tissues) are first disrupted mechanically. Yeasts or bacteria can be treated with beads or ultrasonicated, mammalian cells can easily disrupted by a micro-homogenisator; if no subcellular fractions are requiered, differential centrifugation can be omitted.

Preliminary:
1) Detach cells when confluent from T-25 flask by Trypsin-EDTA treatment (0.5 ml): ~ 10 min @ RT
2) Stop reaction by adding 2.5 ml medium containing FBS. Expected cell number is about 1*106 N/ml.
3) Centrifuge cells in Eppendorf tube (2,500 g, 30 s) and wash cells twice with cold PBS.
4) Resuspend cells in 150 µl icecold Cell Lysis Buffer (containing PMSF) and disrupt cells with a micro-homogenisator. Clean microhomogenisator with 100 µl Cell Lysis Buffer.
5) Store cell extract at -20 °C until usage.

Afterwards the cell extracts are heated/boiled with SDS and thiol-reducing agents in order do denaturate the protein structure and that the SDS adsorbs to hydrophobic sites of the protein (1.4 g SDS/g protein). This guarantees a homogenious negatively charged protein-SDS complex which migrates in an electric field according to their molecular weights (and independent of the pH of the buffer and pI of the proteins; glycosylated or phosphorylated proteins are to somewhat an excepetion).

6) Thawn up cell extract (250 µl) and add 50 µl 5X SDS Sample Buffer (or 5X Protein Loading Buffer + 10 µl 20X Reducing Agent; Ready to use).
7) Heat up immediately to 95 °C for 5 min (70 °C for 5-10 min for membrane proteins?).
8) Vortex sample vigorously (add glass beads) to shear DNA.
9) Centrifuge sample (5 min @ 15,000 g).

General Considerations:

- add protease inhibitor prior mechanical cell disruption (at least EDTA against Metallo proteases and PSMF against Serine proteases).
- beware that β-mercaptoethanol or DTT counteracts PMSF.

- add to 3 vol. sample 1 vol. Sample Buffer, mix and heat for 3-5 min to 95 °C in order to inactivate proteases and destroy any tertiary structure. Afterwards sample can be stored @ -20 °C.
- add aliquoted β-mercaptoethanol or DTT only immediately prior use to sample buffer to obtain complete reduction of the proteins.
- membrane proteins may aggregate due to boiling up with SDS and β-mercaptoethanol.
- cellular DNA can form with SDS a slime, which is difficult to load onto the gel and may interfere the run of the gel. Pretreatment with DNase I and RNase A counteract or vortex with glass beads to shear the DNA.
- avoid K+-ions as they precipitate SDS.
- SDS precipitate at < 10 °C.
- prior loading the sample should be centrifuged in order to eliminate precipitations.

2) PA-gel preparation

Gel Casting System

In the CBL we use the Mini-Protean Tetra Cell (Biorad #165-8001), so the further explications refer to this system. The mini-gels are about 8.5 x 7.5 cm x 1 mm (= ~6.5 ml) and have 10 wells (= ~40 µl sample). Other systems from other brand are working in a similar manner.
Use Nitril gloves to:
- not transfer fat or proteins into the experiment
- protect yourself against acrylamid (> 480 min)
beware: they do not protect againt acetone!
Gloves
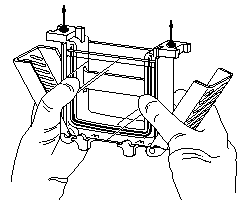
1) Clean glass plates with acetone (fatt-free) and let them dry

2) Place Short Plate on top of Spacer Plate (1 mm)
   Top side of Spacer Plate is indicated

3) Slide both into the green Casting Frame
   Keep the Short Plate in front
   Insure that both plate reach the bottom and align them perfectly

4) Lock the pressure clamps to secure glass plates
   Place a strip of parafilm on the bottom of the glass plates to avoid leaking of unpolymerized acrylamide
Gelcast  Gelcast
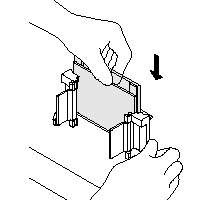
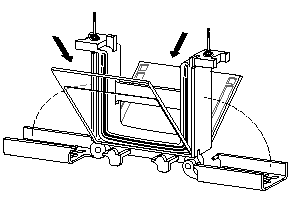
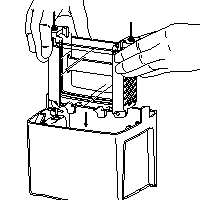
5) Place grey Gasket (rubber-foam) onto the Casting Stand
   Keep Gasket clean and dry, as it swells when soaked with water
   (if so, let them air dry before gel casting)

6) Place Casting Frame on Casting Stand with engaged clamps in front
   Fix Plates/Casting Frame with the spring lever

7) Insure the save standing and avoid any misaligning

(images are taken from the instruction manual)
Gelcast

PA-gel

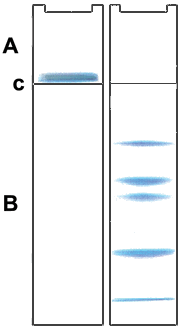
The Discontinuous or Laemmli or Tris-Glycine-Buffer System separates the denaturalized protein-SDS complex by molecular sieve effect in a polyacrylamid matrix. The pore size of the matrix determines the separation efficiency and depends on the molecular weight of the proteins.

Usually the Laemmli gels are composed of an upper stacking or casting gel (A), to concentrate the protein sample, and a resolving or separating gel (B), to separate the proteins by their molecular weight.
Like this the sample is concentrated at the border between both (C), the proteins migrate more homogeneously into the resolving gel and thus sharper band can be achieved.
(image taken from "wikipedia")
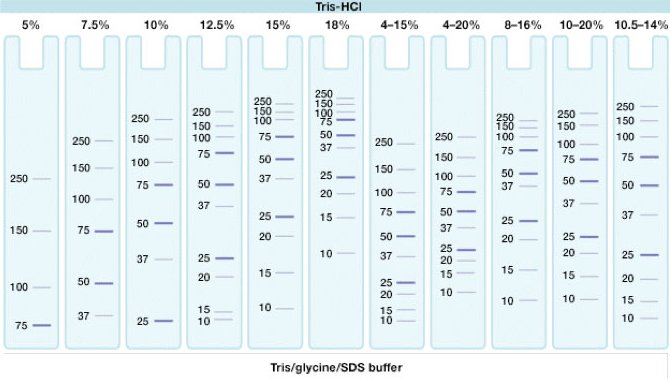
Laemmli

The following figure shows the separation of the proteins depending on the pore size = acrylamid concentration.
Laemmli

Gel composition

Gel Stacking (3 ml) Resolving (7 ml)
Conc. 5 % 6 % 8 % 10 % 12 %
A. dest. [ml] 2.185 4.06 3.71 3.36 3.01
40% Acrylamid/bis, 37,5:1 [ml] 0.375 1.05 1.40 1.75 2.10
Resolving Gel Buffer
1.5 M Tris, pH 8.8 [ml]
-- 1.75 1.75 1.75 1.75
Stacking Gel Buffer
0.5 M Tris, pH 8.8 [ml]
0.38 -- -- -- --
10% SDS [µl] 30 70 70 70 70
degas the mixture for 15 min + + + + +
TEMED [µl]
add prior pouring gel
(Biorad recommends 5 µl for resolving gel?)
3 7 7 7 7
10 % (fresh!) APS [µl]
add prior pouring gel
30 70 70 70 70

Pouring the PA-gel

1) Add the comb into the plate sandwich and mark with an Edding a fine line 0.5 cm below the comb
   (this will be the top of the resolving gel). Remove the comb
2) Prepare the Resolving Gel Solution (~7.5 ml per gel) and Stacking Gel Solution (~3 ml per gel) until the degas step
   DO NOT add TEMED or APS!
   These quantities are more then enough for one gel

3) Add TEMED and APS to the Resolving Gel Solution, mix briefly (w/o introducing air)
4) Pipette the Resolving Gel Solution smoothly into the plate sandwich until the mark
   Avoid the formation of air bubbles
5) Overlay the solution immediately with water or (better) isopropanol
   Do not use isobutanol
6) Let the gel polymerize for 45-60 min (residual solution will polymerize, too)

7) Remove the isopropanol and water and dry the resolving gel with a filter paper
   Do not keep the isopropanol for longer time on the gel, as this will dry
8) Add TEMED and APS to the Stacking Gel Solution, mix briefly (w/o introducing air)
9) Pipette the Stacking Gel Solution smoothly onto the resolving gel until the top of the short plate
   Avoid the formation of air bubbles
10) Insert immediately the comb
11) Let the gel polymerize for 45-60 min (residual solution will polymerize, too)

The gel can be stored overnight at this stage: Wrap the gel up with a napkin/tissue paper soaked with A. dest., place it into a sealed plastic back (to keep the gel humid) and store it at 4 °C.

Electrophoresis Assembly

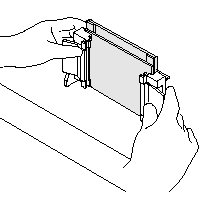
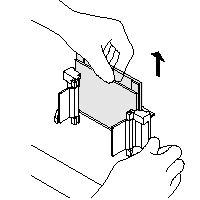
1) Remove Casting Frame from Casting Stand

2) Release PA-gel Cassette from Casting Frame

NOTE: When running 1 or 2 gels, use the Assembly Module (the one with the banana plugs), only when running 3 or 4 gels, use additionally the Companion Module.

3) Open the lateral green clamps from the Module and place it on the desk

4) Place one PA-gel Cassette onto the white support, the short plate facing inwards
   Place on the counter-side a second PA-gel Cassette (short plate facing inwards)
   or the dummy-plate (buffer-dam)
Gelcast  Module
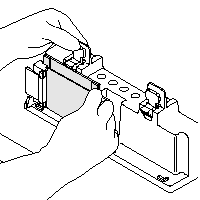
5) Keep both Cassettes upright with the hands and align them perfectly
   Make sure that the short plate sits below the notch of the green seal
   Close the lateral green clamps to fix the plates

6) Place the Module(s) into the Tank
   Beware the orientation: black (-) and red (+)

NOTE: When running only 1 or 2 gels
DO NOT place the (empty) Companion Module into the Tank!

7) Add ~150 ml Running Buffer between the plates (Upper Chamber)
   just under the top of the Spacer Plate (outer gel plate)

8) Remove carefully the comb and wash the wells with Running Buffer
   in order to remove residual, not polymerized acrylamide

9) Remove all formed air bubble (in the wells or under the gel)

(images are taken from the instruction manual)
ModuleModule

Running the Gel

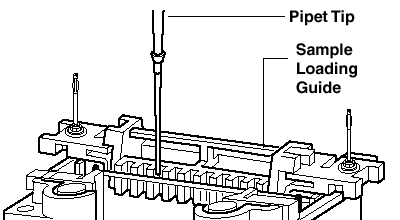
1) Place the (yellow) Loading Guide between the 2 gels
   press/fix the Loading Guide against one plate at the time?

2) Use the slot to load the samples into the corresponding wells (pipette)
   Load samples slowly to led them settle down
   Use same volumina to avoid distortions
   For the same reason fill not used wells with 1X Sample/Loading Buffer
   Load 5-10 µl Rainbow Size Marker (Biorad #161-0324) into one well of each gel

Protein load:
well with 1 mm (thick) x 5 mm (wide): up to 40 µl sample and 0.6 mg protein

3) Fill the tank with Running Buffer until the indicated level:
   550 ml for 1-2 gels and 680 ml for 3-4 gels

4) Tap the tank and insert the cable into a Power supply (Major Science, MP-3AP)

5) Use constant 200 V (for 1-2 as well as for 3-4 gels), 60-80 mA at begin, 40 mA at the end
Run time is about 60 min
use 10 mA until bromphenol blue reached resolving gel, then use 15 mA
Run time is about 60-90 min
use 140 V; at the beginning 100-125 mA, at the end 60-80 mA
Run time is about 55 min

Gel loader
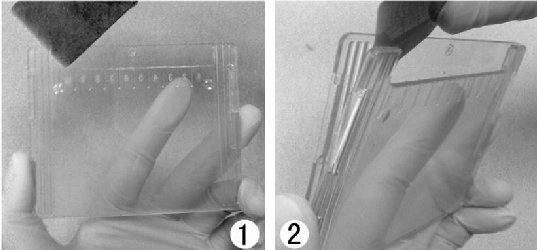
6) Turn off power when bromphenol blue has reached the end of the resolving gel and disconnect tank

7) Remove lid, take out Module(s)
   Pour off Running Buffer from the Module (Upper Chamber)

8) Open lateral green clamps from the Module and remove the PA-gel Cassette
   Separate the glass plates by introducing a green Gel Releaser and twist carefully
   Float the gel off, e.g. with A. dest.

Gel release


General Considerations:

- Do not adjust the pH of the Running Buffer with HCl - exact weighing is sufficient and the additional Cl--ions cause unsharp bands.

Sample protein does not enter into Resolving Gel
-> Use sufficient SDS in Sample/Loading Buffer
-> Sample must be blue after adding Sample/Loading Buffer (bromophenol blue), otherwise pH is not correct and the proteins will not be charged negatively

Band with "smilies": Gel heated up in the centre
-> Running Buffer was not well mixed
-> Reduce voltage of run

Vertical band streaking: a) Sample overload or b) precipitation
-> a) Dilute sample
-> b) Centrifuge sample before adding SDS
-> b) Not enough SDS to solubilize all protein
    specially membrane proteins may precipitate during stacking
-> Reduce voltage of run

Lateral band spreading: a) Diffusion of sample prior run or b) precipitation
-> a) Run gel immeadiately after loading
-> b) Lower ionic strength of sample than of gel

Distorted bands: a) Poor polymerization of stacking gel (wells) or b) uneven borderline between stacking and resolving gel or c) salts in sample (>> 100 mM) or d) air bubbles in sample well
-> a) Degas Stacking Gel Solution
-> a) Increase APS and TEMED conc.
-> b) Overlay Resolving Gel Solution carefully with isopropanol
-> c) Desalt sample (add 5 vol. icecold MeOH, store 2 h at -20 °C, centrifuge, discharge supernatant, dry, dissolve pellet in Sample Buffer)

Lanes constricted at bottom: a) salts in sample
-> a) Higher ionic strength of sample than of gel


Run takes too slow: a) Running Buffer too concentrated or b) salts in sample
-> a) Dilute Running Buffer
-> b) Desalt sample

Run is too fast: a) Running Buffer too diluted or b) too high voltage
-> a) Check Running Buffer preparation protocol


Gel overloaded
Bands streaking
Bands spreading
Bands distorted
Bands distorted
Gel overloaded
Bands streaking
Bands spreading
Bands distorted
Gel constricted
Pictures taken from: SDS-PAGE "Hall of Shame": (http://www.ruf.rice.edu/~bioslabs/studies/sds-page/sdsgoofs.html)


Staining

The further treatment of the gel depends on the needs of the researcher. Frequently the proteins are transfered to a membrane (-> blotting) for further, specific (antibodies) detection. To visualize the proteins in the gel itself, they can are commonly stained by Coomassie, Copper chloride or Silver

Coomassie

This staining is irreversible thus once stained, the gel can not be used for other purpose. With this method you can observe, e.g. the overexpression of a certain protein. This technique can also be used for confirming the efficiency of a blotting process, by staining the gel *after* the blotting (the proteins have to be disappeared). The detection limits are ~ 10-30 ng protein (0.3-0.5 µg/0.5 cm band).

Classic

Fixation
After stopping the gelectrophoresis, the proteins will diffuse within the gel. To avoid this, the proteins will be precipitated with MeOH/HAc: 50 ml Fixation Solution per gel (40 ml A. dest., 10 ml Glacial acetic acid, 50 ml MeOH or EtOH).
Fix gel for 60 min in this solution. (~ 10x reuseable)
Staining
0.25% [0.05%] Coomassie blue dye (0.1 g) [~ 0.02 g] in Fixation Solution and stain for 1-3 h (overnight). (Staining Solution can be reused).
Dissolve Coomassie blue in MeOH or EtOH before adding.
De-staining
50 ml Destaining Solution per gel (34 ml A. dest., 4 ml Glacial acetic acid, 12 ml MeOH or EtOH).
Destain gel until it is (nearly) clear.
Alternative
Destain with A. dest. 2x 5 min in microwave.

Colloidal Coomassie Brilliant Blue G-250 (CBB-G250)

Pre-treatment
- Wash gel 3x 10 min with 25-50 ml warm A. dest. (microwave: no not boil).
Microwave (Daewoo, KOR-6NDB): heat 1 min @ 50% power
- It is critical to remove the SDS from the gel.
Stain
- Shake CBB-G250 Staining Solution
- Transfer gel into 25-50 ml warm CBB-G250 Staining Solution (microwave, do not boil!).
Microwave (Daewoo, KOR-6NDB): heat 30 s @ 50% power
- Stain for 15-180 min
De-stain
- Wash gel 3x 10 min with 25-50 ml warm A. dest. (microwave: no not boil).

Copper

Wash gel briefly with A. dest and stain it with 0.3 M CuCl2 for 5-15 min. Wash briefly again with A. dest. and view it against a dark background (proteins come up as clear zones).The detection limits are ~ 1 ng protein.
Gels can be destained completely with 0.1 M Tris-HCl, pH 8 + 0.25 M EDTA.


Drying

Gels can be dried and stored. Before drying all HAc and alcohol have to be washed away.


back


Last modified: 07.02.2012